Logo WT Win-Test header
Francais English
Deutsch Espaņol

Home

Overview
Features
Minimum requirements
Licence
Testimonials

Support
Quick start
Documentation
FAQ
Mailing list

Downloads
Trial version
Reference manual
Buy Win-Test
Register Win-Test

Contacts


No time for a full manual reading ?


Win-Test is "Launch and Run" ! Read on :

Download the Quickstart in PDF format here

QUICKSTART Win-Test 4.5.1

Last update : August 6th 2010

Preamble : This QUICKSTART gives the user basic informations to use Win-Test as fast as possible. It’s not the full documentation which is also available on this site. Description is thus voluntarily "light". A full documentation is now available in English in "wiki" format at : http://docs.win-test.com

0 - Download Win-Test :

Win-Test is available in a fully-functioning trial version for a 15-day period. You can download it on this site :

http://www.win-test.com

In this trial version, the application randomly quits (between 30 minutes and 2 hours after startup), and report files (cabrillo, reg1test) are non-available.

Install the software in a directory on your harddisk you like, normally in C :\Program Files\Win-Test.

Be careful since v4, you must be admin user of Windows to install Win-Test.

After this period, you can purchase and register Win-Test, in order to use it without limitation, or uninstall it.

When registration is complete, you will no longer have to press the [1], [2], or [3] buttons.

Minimum requirements : WinXP (2k not tested but may mork - feedbacks welcome). PIII 500 MHz - 64 MB RAM - 800 x 600 screen resolution.

Enhanced compatibility with Vista and Seven (Auxiliary and ini files are now stored in directories these OS accept with no additional rights :

Windows XP : Documents and Settings\All Users\Application Data\Win-Test\ Windows Vista : ProgramData\Win-Test\

Note that these directories may be hidden by Windows Explorer. Check the Folders Options of Windows Explorer.

Several sub-directories are created and used by Win-Test. Their names are self-explanatory.

1 - Launch WIN-TEST and setup the contest :

Select File/New and give a name to your contest file. It is advised to use a characteristic name which you will easily identify later (ex : FY5KE2002arrlSSB). The filename must be compatible with Windows limitations, and must respect Win-Test extension : .wtb

To load a previous contest file use File/Open.

(GIF)

Contest Setup

Most of the fields in this dialog are used for contest report file, so fill them with attention. Please note that :

-  Station informations will be displayed in the report file.
-  Profiles : You can define 5 different station profiles. Profiles are a set of station information (Callsign, Name, Address, etc.) that can be grouped and reused when neccessary. Profiles are saved in specific sections in the wt.ini file (Button "Save as"). They can be recalled by pushing Button "Load".
-  Points are computed according to the rules of the selected contest.
-  The "Exchange" field will be transmitted in CW (see CW messages configuration).
-  The "Locator" field must be filled only for VHF contests, but it will be also useful for an HF contest to accurately compute beam headings and Sunrise/Sunset times.
-  All computers in the network must have different names. In order to synchronize the time of the QSO recordings, one computer (and only one) must be declared "time master".

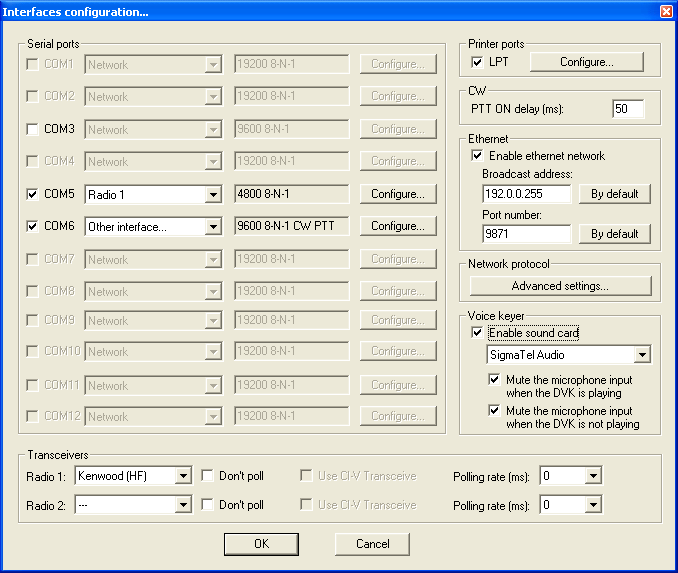
When done, it is advised to enable the Options/Load contest at startup option. Win-Test will then restart quicker during the contest if needed.

Select Options/Language to choose the language (French, English, German, Spanish, Italian) of the menus in Win-Test.This change doesn’t take effect until you restart Win-Test.

2 - Setting up the interfaces :

Select Options/Configure Interfaces to access interfaces settings.

Transceiver control :

Win-Test can control (frequency, mode) by the serial port (RS232) the most current HF transceivers (Kenwood, Icom, Yaesu, Ten-Tec, Elecraft). Some of them are directly compatible, in particular the most recent ones, others may require an interface (ex : TS-850S Interface Link). You must specify the transceiver model, and the communication port properties (speed, data bits, ...).

Please note that :
-  SteppIR Antenna Interface(www.steppir.com) is compatible with Win-Test (Use an Y cable).
-  ALPHA Amplifier Interface is also support by Win-Test.

(PNG)

Interfaces Setup
(GIF)

Serial ports COM properties

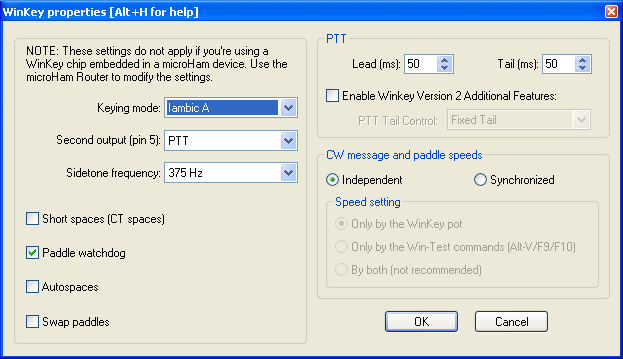
CW Interface :

Win-Test automatically generates CW and PTT keying with the parallel port (LPT) outputs or with the serial port (COM) outputs. The interface described below is very simple. It is compatible with several other great contest softwares. However, there is no direct input for an external paddle. If you want to send CW with a key, you will need an external CW keyer, whose output will be wired in parallel to the CW key input of the transceiver.

CW interface diagram :

(GIF)

CW LPT interface

(GIF)

CW COM interface

Transmission will be activated with the VOX, or with an identical interface using pin 16 (instead of the 17) : The collector of the transistor will then be wired to the PTT IN input of your transceiver.

(GIF)

LPT port properties

(PNG)

COM port properties

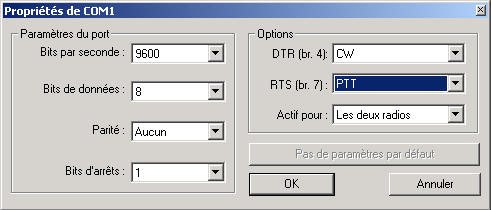
If you choose the serial port (COM) , use the pins listed below :

Serial Port (9 pins) [usual case]

-  Pin 7 = PTT (RTS)
-  Pin 4 = CW Output (DTR)
-  Pin 5 = Ground

Serial Port (25 pins)

-  Pin 4 = PTT (RTS)
-  Pin 20 = CW Output (DTR)
-  Pin 7 = Ground

Don’t forget to wire the transistor emitter to the ground pin of the serial output.

(GIF)

CW serial port properties

Be careful if RTS and DTR are used for CW/PTT , no hardware handshaking is available for this Serial Port.

Note : WINDOWS 2000, XP or NT users will need the DLPORTIO.DLL to use serial and parallel ports.

You will easily find sites to download and install this DLL, for example :

http://www.driverlinx.com/DownLoad/DlPortIO.htm

Port95nt.exe must be launched to install the appropriate DLL and generate CW with the parallel or the serial ports.

Click on Options/CW/Modify standard messages or Options/CW/Modify additionnal messages to setup the CW messages.

You can use the following variables :

-  $MYCALL : My Callsign
-  $GRIDSQUARE or $LOCATOR : My Locator
-  $ZONE, $DPT, $STATE, $OBLAST or $PROVINCE : Content of exchange field in contest configuration window
-  $PWR ou $POWER : Power (ARRL DX - DX side)
-  $RST : RST sent
-  $LOGGED or $LOGGEDCALL : As its name indicates
-  $SERIAL : QSO serial number
-  $CR : Mimics a Carriage-Return in the Log
-  $CORRECT : Send logged call if it were corrected by the operator
-  $QSOB4 : Send QSOB4 if dupe qso. Note : Data following the $QSOB4 variable are not keyed if it’s a dupe QSO.
-  $F1 : send message #1
-  etc...
-  $F7 : send message #7

+ and - signs can be used to increase or to decrease the keying speed within the message. Exchange abbreviations can be setup with Options/CW/Serial number (cf full documentation) , or by the text command : NOCUT, SEMICUT, FULLCUT, PROCUT.

The weight of the CW can be ajusted by the text command WEIGHT or CWWEIGHT in the callsign field of the main window or by Commands/CW Weight.

The Version 4 of Win-Test introduce the ESM Option (Enter Sends Message) : Enabled/Disabled by the Tools/Data entry/ESM Enabled menu. You can also use the ESM/NOESM or ESMON/ESMOFF text commmands. It relies on the following messages assignation :

F1 : CQ F2 : Sent report F4 : Mycall F5 : Logged callsign ($LOGGED) F7 : ? (or "Again ?" in phone) INSERT : Callsign + sent report PLUS : TU + enter Q

When the ESM is enabled, as the return key *can’t* be used anymore to log silently a QSO, the key combination Ctrl+Plus has been introduced and added for this purpose.

-  The W5XD/K5DJ Muli-keyer is supported by Win-Test, it is then necessary to choose W5XD in Options/Configure Interfaces/Serial Port.

-  The K1EL Win-Key (www.k1el.com) is also supported by Win-Test, it is then necessary to choose Win-Key in Options/Configure Interfaces/Serial Port for COM Port configuration, and then Winkey configuration in Options to set WinKey properties.

(PNG)

SO2R Boxes :

-  EZMaster SO2R box from hamradio-solution (www.hamradiosolutions.com) is supported by Win-Test in advanced mode. Radio switching, DVK, Winkey are controlled by Win-Test. Choose EZMaster in Options/Configure Interfaces/Serial Port for COM Port configuration. Connect EZMaster box via USB cable is the best. Choose EZMaster Configuration in Options to set properties (Matrix profile,...), please refer to EZMaster Documentation.

(GIF)

-  ZS4TX SO2R (http://www.zs4tx.co.za/sck/) is also supported by Win-Test.

-  MK2R SO2R and USB MICRO 2R from MicroHam (http://www.microham.com/) is also supported by Win-Test in advanced mode. Go to Options/Configuration MK2R to set properties. You can use either PC sound card or internal MKII sound card for Digital Voice Keying. For more details look at the wiki documentation here :(http://docs.win-test.com/wiki/SO2R/MK2R/Setup)

(GIF)
MKII Properties

With So2R boxes you can enable pin14 of LPT to drive the active radio (A/B), select the pin for Stereo RX (A and B).

In SO2R mode the SHIFT Key can be used to bind every keyboard entries relevant into the "Secondary Radio". Set/Reset by Operating/Shift bind to the secondary radio. SHIFT + numpad can also be bound to 2nd radio.

Automatic Voice-Keyer :

Win-Test can also send calls in phone modes, using your PC soundcard via an audio interface (PC/transceiver).

(GIF)

SoundCard Interface

It can also control an external DVK (Digital Voice Keyer) like MFJ-434, Check the boxes for DVK in LPT properties (becareful Pin 2 is shared between DVK and BandDecoder).

(GIF)

DVK Interface

Extended DVK allows 6 messages (ZS4TX SO2R for ex) , pin7 for msg#5 , pin8 for msg#6.

DVK LPT Properties

Activate the Tools/Automatic CQ repeat mode option to send CQ message at timed intervals.

Press F1 to start sending CQ message.

Variable speed for the integrated voice keyer : An exclusive Win-Test v4 feature ! You can play your voice files at a different speed (between -20% and +70%) from the original recording speed. Record your voice files at normal speed, and use Alt-F9/F10 (as in CW mode) to play them at a different speed. The speed in displayed at the bottom of the (Rate) Alt-R window.

Network :

Win-Test work with RS-232 (COM port "3 wires" or "5 wires"), or with Ethernet network (crossed cable for 2 computer or via a Hub for more). Your computer must have a network card. Ethernet is the best way because less HF sensitive and do not use COM port wich are very useful for TRX interface for ex.

To active your Ethernet network, please refer to the windows Options/Configure Interface. Each computer have is own Ip address in the network. Win-Test use Broadcast. Reminder : If you use WT in a networked environment, you must have the same WT version on all machines ! For more details on Ethernet network configuration go here .

Packet cluster :

Win-Test control TNC (Normally 8 bits DATA, No parity, 1 bit Stop), use a 3 wires cable (Software Handshaking), or a 5 wires cable (Hardware Handshaking).

Internet cluster :

Connecting to a telnet cluster is the work of an external application provided as part of the Win-Test package called ’wtDxTelnet’. This program maintains the connection to the cluster, NOT Win-Test itself ! . Download wtDxTelnet here . Configure wtDxTelnet : Choose your Cluster , IP port , your login password on this cluster. Then configure Win-Test (Options/configure Interfaces) to allow Win-Test and wtDxTelnet to communicate (IP + port). For more details please refer to wiki : wiki Telnet.

Band Decoder :

Information on LPT port is also available to drive a band decoder, it’s compatible with Yaesu Data.

BAND DATA

D(9)C(8)B(7)A(2)Band
0000-
0001160m
001080m
001140m
010030m
010120m
011017m
011115m
100012m
100110m
10106m

LPT pin in parentheses.

RTTY Mode : Win-Test support RTTY contest with MMTTY engine from JE3HHT. First download "MMTTY Engine" from MMTTY Website and install it. Launch MMTTY to set properties. Then , go to Option/RTTY Configuration in Win-Test, and set Path of MMTTY and other properties.

For more details please refer to wiki RTTY and to the RTTY Contesting web site.

(PNG)

RTTY Configuration

<<< When all setup is done , click on OK >>>

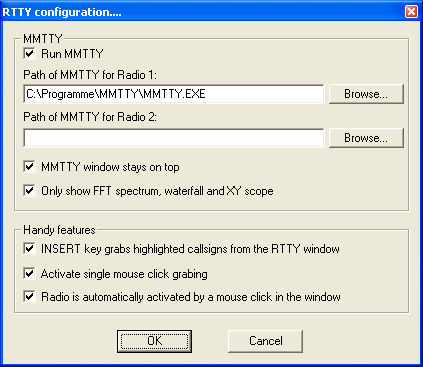
With Version 4 you can control all your rotors using wtRotators software included in Win-Test package. This program (wtRotators) communicates directly with the rotator hardware via serial ports, not Win-Test. Win-Test just sends broadcast messages to wtRotators.

Hardware interface from Pablo EA4TX is fully supported by wtRotators : EA4TX

For more information look at the wiki : Rotors

With Version 4 you can now use an integrated MP3 contest recorder and player. Use the Options / MP3configuration (or MP3SETUP Text command) to set the audo device that will record and play the file, the various sampling and bit rate settings.

(GIF)

MP3 Configuration

Now, you can browse your log with usual arrow keys and to listen to a specific Q but clicking the Play button or use the AltGr-Enter combination (some keyboard do not have an AltGr key, so use Ctrl+Alt instead). You can also go back and forward with the adapted buttons or use AltGr-Left and Right. To pause/play,you can use the AltGr-Space combination. An Extraction Feature in Contest Recorder is available : right-click in the Contest Recorder Window, and chose the "Extract and Save QSO" menu.

(GIF)

MP3 Recorder

3 - Main Window and Contest entry

The main window is composed of :

-  Menus (from File to Help), and menu items
-  Shortcuts and icons
-  Windows which can be opened, located, and resized
-  Entry fields for callsign and report

The Ctrl key + wheel-mouse combination may be used to resize the font of most of the windows.

Note that function keys and text commands are described in the full documentation.

(PNG)

Full size - 82 Ko

Main Window of Win-Test

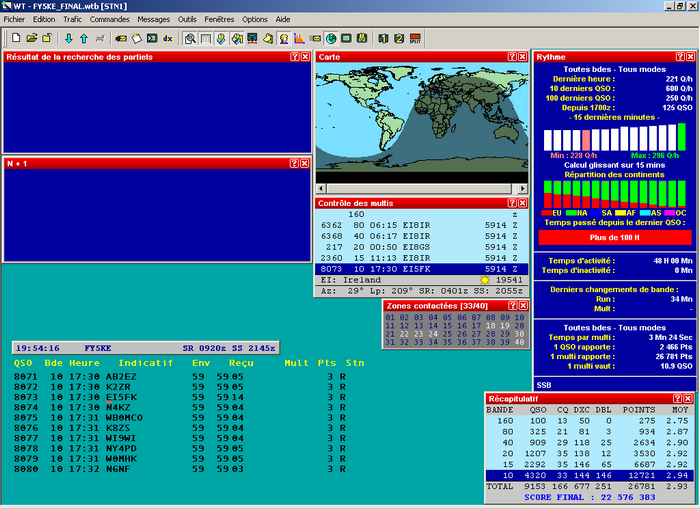
A - QSO Entry

Field description :

FieldData
1QSO #
2Running band
3UTC time of QSO
4Logged callsign
5Sent report (without Exchange Zone)
6Received report
7Multiplier
8Points per QSO
9Station type (R=RUN,...)

QSO# column can be hided with Options/log/Hide QSO Numbers.

VHF contests display more data like locator, distance (In Miles or Km) and beaming.

The cursor is automatically positioned in the callsign field, and skips to the report field when the SPACE BAR is pressed. Use the TAB key to skip to "sending report" field (not very useful in HF Contest).

Use the ">" key to modify the QSO time.

When the space bar is pressed, dupe check and multiplier check are processed.

Version 4 introduce on the fly callsign pattern check based on the K1TTT callsign.pat file (over 400 rules applied today). Use the Tools / Data entry /Callsign check menu option. You are encouraged to report the author any mistakes or improvements of this file (k1ttt@arrl.net). The file is located in the cfg directory.

B - Other Windows :

Some of windows described below can be accessed with icons (Icons Bar) or with shortcuts. Place cursor on icons (without clicking) to see their action. Color of each child window title bar can be customized by a right click on it. Some of them can also be resized by CTRL+wheelmouse. You can drag windows bya click on the title bar or with CTRL+Click anywhere in the windows.

With Options/Windows/Default Layout you can select windows which are opened when a new contest Log is created.

(GIF)

Icons Bar

There are three kinds of windows :

1 - Temporary windows (disappears once the action ended) :

-  Tchat : Alt+G to open (escape to close) or Messages/Send a gab. Allows to send a message to all the stations via the network or into private at only one station of the network.

-  Write a note regarding a QSO : Alt+N to open (escape to close) or Messages/Write a note regarding to this Qso. Allows to write a note to your current contact (ex : zone 4 ???)

-  Keyboard Mode : Alt+K to open (escape to close) or Commands/Keyboard Mode. Allows to key CW keyboard entry.

-  Ctrl+T (escape to close ) or Commands/Carrier, allows also to send a TUNE or Pulses (To tune your PA for example).

-  Send a command to the Cluster : Alt+T to open (escape to close) or Commands/DX Cluster. Allows to send a "Cluster" command (use standard Cluster syntax). Alt+F3 (escape to close ) ou Commands/Spot Allows to spot the callsign on which the cursor is located. You can use macro commands in this mode, SHIFT+Mouse Click on the "MACRO" button to edit, Click to execute the macro.

-  HamCAP : Win-test also supports VE3NEA HamCAP software. Ctrl+P once the call is entered allows to display the propagation prediction for this country. You can also customize the display with Options/HamCap.

-  Alt-D : Allows to pass a callsign to another station of the network.

-  Alt-E : Allows to take a sked, an alarm will appear just before the sked.

2 - Permanent windows, to open only if needed (recommanded) :

-  Tchat : Alt+I to open (escape to close) or Windows/Gab. Displays sent messages between stations. You can move in the window with the scrollbar , and go to the last line by clicking the small icon in the title bar.

-  Worked locators (VHF only) : Alt+L to open (Alt+L to close), or Windows/Worked Gridsquares. Displays already worked locators. One red point for each QSO, and every worked locator is grayed. A right click on the map allows to copy this map, or to specify the map properties (Center map on a locator for example).

-  Worked zones : Alt+Z to open (Alt+Z to close), or Windows/Worked Zones. Displays zones (or states, ..., according to the contest) already worked (blue) or not (white). A total count is diplayed in the title bar.

-  Worked countries : Alt+M to open (Alt+M to close), or Windows/Worked DXCC. Displays already worked countries DXCC (by continent). A right Click on the window allows to select order , filter for displaying and select the bookmark.Use SHIFT+wheel mouse to browse the different bookmarks. You can copy as text (and pasted as text or directly in a spreadsheet program).

-  Rate Information : Ctrl+F9 to open (Ctrl+F9 to close), or Windows/Rate sheet. Displays the QSO rate hour by hour. Many options are available with a right click on the window (Resizable).A tab named "CONTINENTS" display the % of qso’s per continent, use right click to customize display. You can copy as an image or a text also by right click. A tab "OBJECTIVES" display an hourly comparaison between cureent data in log and objectives defined in a .OBF file. This file can be created manually or by tools/export an objective file from the log of the past year for example. To use it select Tools/Load an objective file.

-  Map : Windows/World Map, no keyboard shortcut. Displays "Gray line". You can resize and customize it with a right click.

-  Dx Cluster Monitoring : Alt+O to open (Alt+O to close), or Windows/Dx-Cluster Monitor. Displays all DX cluster spots (not only multipliers). You can move in the window with the scrollbar , and go to the last line by clicking the small icon in the title bar. A Time-Out alarm can be activate by a right click (No Activity alert from the cluster).

-  SSB Level Bargraph : Windows/SSB Bargraph, no shortcut. Displays audio level of the automatic Phone keyer. Use CTRL+Wheel Mouse to resize it.

-  Status : Alt+J to open (Alt+J to close), or Windows/Status. This window displays the status of all stations connected to the network. Your own station is displayed on a blue background, the running radio is displayed in red. To configure the station type use Commands/Station type. To set the QSY frequency use Commands/QSY frequency menu item, or use the QSYFREQ or PASSFREQ text commands in the logging callsign field. Last 3 digits of the frequency required.

-  Skeds : Alt+B to open (Alt+B to close), or Windows/Skeds. Skeds taken by Commands/Take a sked or Alt+E are displayed in this window. Background colors shows the time positition of the sked. A right click configures display options. A double click fills the callsign field and automatically tunes the radio on the sked frequency.

-  Solar activity : Solar/Activity allows to display the graph of the solar activity, which is generated with the data issued from the cluster.

-  Check Callsign : F9 to open (F9 to close),or Windows/Check Callsign allows to display the bands on wich the callsign was already worked. You can also customize this window by a simple right-click.

3 - Permanent windows, recommended to be always opened :

-  Check Multipliers (DXCC country or IOTA) : F10 to open (F10 to close), or Windows/Check Multipliers. Displays already worked countries DXCC (or IOTA) (by band). With graphical indication of the sun status on both sides of the QSO

-  Summary : Alt+S to open (Alt+S to close), or Windows/Summary. Displays score in realtime. You can copy this window with a right click. Dupe QSos can be include or exclude by a right-click.

-  Check partials : F12 to open (F12 to close), or Windows/Check partials. The check partial window displays all the callsigns from the Database, which match the letters/numbers in the callsign field of the main window. Already worked calls on other bands are displayed in GREEN, non-worked calls in WHITE, Dupe are in RED. In this window, you can also quickly check if a "ZONE" multiplier has been already worked on different bands : Enter the "ZONE" (State for ARRLDX for example) in callsign field then Shift F10.

-  Check N + 1 : F8 to open (F8 to close), or Windows/Check N+1. Displays all the callsigns from the database which are different by 1 (and only one) letter/number of the call entered in the callsign field of the main window. "Fat fingers check" (2 characters swap) are also displayed. Already worked calls on other bands are displayed in GREEN, non-worked calls are in WHITE, dupes are in RED.

-  Rate : Alt+R to open (Alt+R to close), or Windows/Rate. Displays rates, QSO points value, time ON , time OFF, time since last band change, instant continental distrbution, and multiplier value. A very complete list of options is available with a right-click on the window. A moving histogram (you can also customize it by a simple right-click) is displayed in addition to the statistical data.A time off timer reset by every entered qso display the time passed since the last qso, set it by a right click on the window.

-  Partner : Windows/Partner to open/close. This windows displays all the callsigns entered by your partner ( He uses ALT+ENTER after entering the call in the callsign field of its own computer ). Double Click on the callsign or ALT+line # grabs it in the callsign field. Use ALT+BACKSPACE to clean all the partner window.CTRL+line # switch the callsign field and the line in the partner window.

-  Band map : Alt+1 to open (Alt+1 to close), or Windows/Radio1 (Alt+2 for Radio2). The Bandmap window displays the frequency spectrum. The center frequency scrolls as you turn your VFO, if your transceiver is controlled by Win-Test. You can easily associate a callsign to a signal. The "band map" is fed by DX-Cluster announcement, or by the operator (select or enter a call in the callsign field then Ctrl Enter). With a double-click on the call display in the band map, your radio is tuned on this frequency and Win-Test fills the callsign field of the main window with the band map choosen callsign.

NB : This function is useful only if the transceiver is controlled by Win-Test via the serial port.

"Band map" Example :

(GIF)

Band map

You can modify display options (scale, spot comment and other properties) by a right-click in the window. You can display segments of band map in different colors (regarding the licence type for example), segment are defined in a .seg file. CQ and QSY (set by PASSFREQ text command) cursors can also be displayed using the contextual menu (Right Click) display options. You can also display Markers in the band map ( Beacons for example ), Markers are defined in a .mkr file. Use contextual menu ( Right Click ) to choose colors.

A tab named "LIST" is also available, use right click to customize display.

A small icon allows to visualize the position of the sun in the country of the spot (Moon for night, Sun for daylight, Sunrise/Sunset), and guessed exchange. A summary is displayed in bottom of this window.The following informations are available : Number of spots, Number of needed Qsos, Number of new countries, Number of new zones, time since last spot and "spotter" callsign.

The split frequency of the current Radio can be modified by Commands/Split Frequency or with the "-" (minus) key of the numeric pad or by the text command SPLITFREQ in the callsign field of the main window. An offset frequency can be entered in Options/Frequency Offsets if you use a Transverter.

-  Dx-Cluster Announcement : Alt+A to open (Alt+A to close), or Windows/Dx-Cluster Announcement. To display missing multipliers announced by DX Cluster. You can change multiplier sort display, filter by bands , delete spotand customize display with a right-click. A double click tunes the radio on the right frequency and fills the callsign field. You can move in the window with the scrollbar , and go to the last line by clicking the small icon in the title bar. Spots can be deleted by CTRL+Double click on it. Spots coming from a CW Skimmer are tagged with a leading indicator (#) .

-  Clock : Windows/Clock. To display UTC TIME. Set time on your PC in local time and select the correct time zone in Windows. Win-Test will then compute and correctly log time in UTC.

-  Extra : Windows/Extra or ALT-X. This windows displays data included in .xdt file (textual file)

4 - After Contest Logfile

Use File/Create log files menu item. Then, select correct file type (ADIF, Cabrillo), add a short comment in the SOAPBOX, and finally choose a file name.

You can then enter your working conditions and your off-periods if you are single-op in the next window.

UTILITIES AND TOOLS

-  Merge To merge files , Select File/Merge Logs, then choose first the MASTER file by clicking on ADD, and then other files to be merged in the master file.

-  Import/Export : Select File/Import Export to Import or Export Log files in Cabrillo or Editest format and convert it in Win-Test format.

-  Clean Log Launch Win-Test or close file which is in use. Select File/Clean Log , choose the .wtb file to be cleaned ( By security , make a backup copy before ). You can choose to delete all qso with your home call, duplicates , and remove /qrp extension. check the Confirm box , the file is cleaned and opened in Win-Test.

-  Objective Files Launch Win-Test with the .wtb file you want to be the objective file. Select Tools/Export an objective file , choose a name for this file (.OBF) , choose the title to be displayed in the future statitistics window, select data to be used , and the click OK. The objective file is ready to be imported for a future contest as a reference.

-  Time Shifting : Select Tools/Time Shifting to time shift selected QSOs by any amount of time - either positive or negative. It lets you correct a constant time offset (like you had set the wrong date on the computer, or the clock was off by one hour).The time shift can be applied to the entire log or to a range of QSOs, to the QSOs entered by your own station (this could make sense in a multi operator environment), to QSOs entered by several stations. WARNING : CREATE A BACKUP FILE BEFORE USING THIS OPTION.

-  Check Log : Select Tools/Check Log to use tools to check your log regarding the contest rules :
-  CQWW 10 minutes rules in Multi-Single.
-  8 or 10 QSY per hour rule
-  Sometimes the multiplier station makes a QSO which turns out not to be a multiplier.
-  Check Probably Bad exchanges (like zone reagrding to the callsign)
-  Display all unique QSOs in the Log, with a N+1 search available.
-  Callsigns syntax check using Tools/Check log, it uses the pattern callsigns rules file (callsign.pat)

-  Automatic Backup : Options/Automatic Backup allows you to proceed or schedule a backup of your log on floppy-disk or USB key. for example.

5 - In case of Problem

Ifyou have any question or problem, you can read the FAQ and archives of the mailing list :

http://www.win-test.com

You can also subscribe to the Win-Test mailing list : send a mail to support-request@win-test.com with subject : SUBSCRIBE if you don’t find an answer to your problem.

Development and technical support team wish you good contests with Win-Test !

contact_webmestre | Site Map | Home page SPIP